
More actions
| IPhone Charging Circuit Diagnostics Guide | |
|---|---|
| Type | |
| Device(s) | iPhone 6, iPhone 6 Plus, iPhone 6s, iPhone 6s Plus, iPhone 7, iPhone 7 Plus, iPhone 8, iPhone 8 Plus, iPhone X, iPhone XR, iPhone XS, iPhone XS Max, iPhone 11, iPhone 11 Pro, iPhone 11 Pro Max, iPhone 12, iPhone 12 Mini, iPhone 12 Pro, iPhone 12 Pro Max, iPhone 13, iPhone 13 Mini, iPhone 13 Pro, iPhone 13 Pro Max, iPhone 14, iPhone 14 Plus, iPhone 14 Pro, iPhone 14 Pro Max |
| Difficulty | |
Description
iPhones that do not charge, charge intermittently, or only charge wirelessly often suffer from faults in the USB input, USB controller (Tristar / Hydra / Kraken), or charging IC power conversion stages.
This guide outlines a systematic voltage-based diagnostic approach to identify where charging fails.
Supported Models / USB Controller Generations
Tristar Models
- Expected voltages:
- PP_5V0_USB = 5 V
- PP_TRISTAR_PIN = 5 V
Hydra Models (up to iPhone 11 series)
- Expected voltage:
- PP_VBUS1_E75 = 5 V
Kraken Models (iPhone 12 series to 14 Series)
- Expected voltage:
- PP_VBUS1_E75 = 5 V
Diagnostic Steps
1. Check for 5 V Before the Charging IC
- Measure 5 V on the capacitor before the charging IC
- This confirms:
- Charger is supplying power
- Port and cable are delivering voltage
❌ No 5 V here = USB input / controller issue
✅ 5 V present = proceed to next step
2. Understand USB Verification Logic
- The charging IC does NOT know if the cable is good
- Cable validation is handled by the USB controller (Tristar / Hydra / Kraken)
If the USB IC cannot verify the cable:
- The device will not charge via cable
- Wireless charging may still work
3. Check USB Verification Line
If 5 V is missing at the USB controller, check:
- PP_VAR_USB_RVP_TIGRIS_R (also referred to as PP_VAR_USB_RVP)
This line is required for USB cable validation.
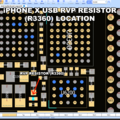
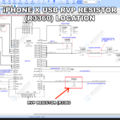
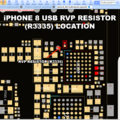
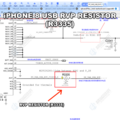
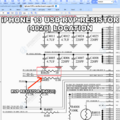
4. Check the 10 Ω RVP Resistor
Applicable to:
- iPhone 8 / X
- iPhone 13 / 14
Procedure:
- Locate the 10 Ω resistor on the VAR_USB_RVP line
- Measure voltage on both pads
- Both sides should show ~5 V
❌ Voltage on one side only = open resistor or downstream fault
❌ No voltage on both sides = upstream USB IC issue
5. Check PWR_GATE_EN_VBUS_1_VALID
- Measure voltage at the PWR_GATE_EN_VBUS_1_VALID test point
Expected result:
- 3.7 V – 5 V (any voltage above 0 V indicates the USB IC is functioning)
Interpretation:
- ✅ Voltage present → USB IC is working
- ❌ 0 V → USB IC is faulty or not powered
6. Wireless Charging Reference
- Wireless charging does NOT require USB verification
- If wireless charging works but cable charging does not:
- USB controller / RVP path is likely at fault
- Charging IC may still be functional
7. Charging IC Power Conversion
- Charging IC buck-converts 5 V → ~3.7 V
- This voltage is required for the battery to begin charging
If 5 V is present but battery does not charge:
- Suspect charging IC or its output stage
8. Check CHG_BOOT Line (Diode Mode)
- Locate the capacitor on CHG_BOOT
- Measure in diode mode
Expected readings:
- ❌ Same diode reading on both sides = fault
- From Tigris IC side → ~ 9 V
- From CHG_LX side → ~ 4 V
| USB IC Part Number | iPhone Model |
|---|---|
| NXP 1610A2 | iPhone 6, iPhone 6+ |
| NXP 1610A3 | iPhone 6s, iPhone 6s Plus, iPhone SE (1st Gen) |
| NXP 1610A3B | iPhone 7, iPhone 7 Plus, |
| NXP 1612A1 | iPhone 8, iPhone 8 Plus, iPhone X, iPhone XR, iPhone XS, iPhone XS Max,
iPhone 11, iPhone 11 Pro, iPhone 11 Pro Max, iPhone SE (2nd Gen) |
| NXP 1614A1 | iPhone 12, iPhone 12 mini, iPhone 12 Pro, iPhone 12 Pro Max |
| NXP 1616A0 | iPhone 13, iPhone 13 mini, iPhone 13 Pro, iPhone 13 Pro Max |
| NXP 1618A0 | iPhone 14, iPhone 14 Plus, iPhone 14 Pro, iPhone 14 Pro Max |
iPHONE USB IC's
-
iPhone 6 & 6 Plus USB IC
-
iPhone 6s & 6s Plus USB IC
-
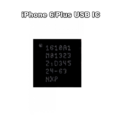
iPhone 7 & 7 Plus USB IC
-

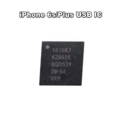
iPhone 8, iPhone 8 Plus, iPhone X, iPhone XR, iPhone XS, iPhone XS Max, iPhone 11, iPhone 11 Pro, iPhone 11 Pro Max, iPhone SE 2020 (2nd Gen) USB IC
-

iPhone 12, iPhone 12 mini, iPhone 12 Pro, iPhone 12 Pro Max USB IC
-

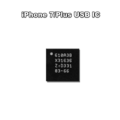
iPhone 13, iPhone 13 mini, iPhone 13 Pro, iPhone 13 Pro Max USB IC
-

iPhone 14, iPhone 14 Plus, iPhone 14 Pro, iPhone 14 Pro Max USB IC


iPHONE RVP Resistor Location
-
iPhone X RVP Resistor Location
-
iPhone X RVP Resistor
-
iPhone 8 RVP Resistor Location
-
iPhone X RVP Resistor
-
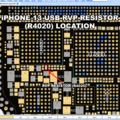
iPhone 13 RVP Resistor Location
-

iPhone 13P RVP Resistor Location
-
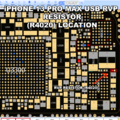
iPhone 13 Pro Max RVP Resistor Location
-
iPhone 13 series RVP Resistor
-
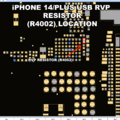
iPhone 14/Plus RVP Resistor Location
-

iPhone 14/Plus RVP Resistor


iPhone USB IC Location
-

iPhone 8 USB IC Location
-

iPhone 12 mini USB IC Location
-

iPhone 12 Pro USB IC Location
-
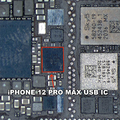
iPhone 12 Pro Max USB IC Location
-
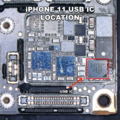
iPhone 11 USB IC Location
-
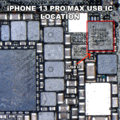
iPhone 13 Pro/Max USB IC Location
-

iPhone 14 USB IC Location
-
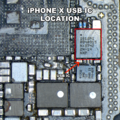
iPhone X USB IC Location
-
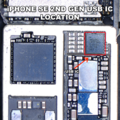
iPhone SE 2020 USB IC Location
-
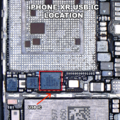
iPhone XR USB IC Location


